Good morning friends and fans! Wow, what a few weeks it has truly been, I've been basically MIA so I figured an explanation was in order. Welcome to my life where a very close friend once told me I'm the busiest person she knows...
First off my husband and I went back to Boston for over two weeks right around Thanksgiving time. It was crazy to see everyone, crazy fun and crazy busy! I caught a massive cold about 4-5 days after we got there so despite having plans with everyone, curing ills became the priority. It meant that other than school work I got about zilch done on the computer so...
The Writer's Retreat I had intended to take myself on for those two weeks after finding out I wasn't painting turned into NyQuil induced sleepy time instead. But the good news is that while driving to see my sister and attend a lovely fancy pants Christmas party last weekend, Matt came up with the title for the second Manuscript! Hooray for my super-muse! Now I'm raring to go. Which of course means I'll need more time off...
From school and winter break is right around the corner. Thank goodness! With only about 10 classes left until I graduate next year I'm so feeling the itch to be done already! Chapters hover in the 60 page pdf file range, papers vary around 3-4 per week, and of course there is interaction with everyone else that has to happen weekly for attendance. I'm tired just writing about it! But with 2 weeks off and a visit from some family during and right after Christmas I look forward to a technical writing break...
Which brings me to my next update of course! I have started a new blog called Writesy: Online Content Proofreading and Editing Services and it is just in the beginning stages but I plan to amp this hardcore next year as this is the work I absolutely love doing - writing, proofing, editing - it is the passion I have and what I want to be my focus. I'm going to do blog posts, merch listings, job postings, school papers, and more! The entire time I have spent trying to build a successful finishing business all I wanted to do was write about it so...
My Chucka Stone Designs shop will stay open for now and I'll still be semi-active with teams, blogs, promotion, but otherwise I'll be focusing primarily on the things that I do best and that mostly includes writing and custom orders...
Now here is where I give an enormous shout out of THANK YOU to all of my clients who commissioned me to create something custom for them this holiday season. I can not begin to tell you just how much it means to me to have had this opportunity to use my creativity and craft something that you loved. The single reason why I continue to keep on keeping on with paint/faux/sew is all of you so thanks, a million and one times over! But that's not all of course...
We are starting the process to purchase our first home in Arizona and the looking/bidding/projecting has us sleep deprived and anxious to get out of this temporary apartment. Winter sports are in full swing and you know that means I'm all about hockey and football all week long. Meeting new friends here in Arizona has been a blast! One of the places I'm meeting new friends is at the Scottsdale Society of Women Writers group which is an amazingly inspiring group of ladies who all work in the world of words in some capacity (publishers, editors, writers, etc). And none of this even accounts for all that silly life stuff that has to still happen - laundry, groceries, keeping in touch with friends and family, etc.
So you can probably understand the need for the hiatus from the blog and all other stuff associated!
Please continue to contact me about custom orders, I love doing them truly!
Or if you are in need of a second set of eyes be sure to check out my Writesy Proofreading Services and contact me over there.
Thanks for understanding and I'll catch up with all of you in the New Year! Have a super happy holiday season and please enjoy some re-posts during the last couple weeks of the year.
December 14, 2011
November 28, 2011
Cyber Monday, EcoEtsy Gift Guide and A Coupon Code for 12% Off

Details about the Gift Guide and its various categories of awesomeness can be found right on the Team EcoEtsy blog here.
I'm fortunate enough to have my shop featured in the Under $75 category of the guide this year and, truly, I couldn't be more excited to share the guide with everyone!
Can you tell by all the exclamation points? :-)
The team is just chock full of amazing products that have a strong focus on the planetary impact our businesses can have. Most designers use environmentally sustainable materials and practices while creating, natural ingredients, reused packaging for shipping and as much Green friendly as possible.
Like I said, my shop is included here and as many of you know I primarily create faux finished items with water based paints that look exactly like the real thing but I didn't have to mine the Earth to get the same look! The pieces used in my faux granite items were either purchased directly from another teammate's overstock stash or from local thrift stores here in Phoenix then given brand new life!
The moss colored faux granite coasters featured at the top of this post are a great example of use of a cutoff from a fellow teammate and were just listed in my shop this morning.
I also salvage fabrics and enjoy upcycling to create something that extends the life cycle of a piece of material which could have gone to a landfill to sit for years. Heck, I'll even use the cutoff bits of my sample boards to create durable faux finished bookmarks!
To see all the items in my shop click any of the items below. Those and more await your discerning eco-eye!
And as a special bonus this holiday season just use the coupon code NEWSTUFF2012 at checkout to receive 12% off your entire purchase! Its my way of saying thanks for spreading the eco love this holiday and saying goodbye to 2011 in style.
Now go, shop, be merry and BE GREEN!!!
November 24, 2011
Happy Thanksgiving!
For those who celebrate I would just like to extend my biggest hug to you all. I hope that you are able to spend this day with the ones you love, doing what you enjoy, eating what you like and most of all remembering the many things you have to be thankful for this holiday and everyday!
Today I'm thankful for indoor heat and plumbing that runs to the dishwasher, homemade meals, laughter and good times with family and friends, all five senses, football, a glass of wine, hugs, and being fortunate enough to have the means to travel back to my hometown to spend this time with the ones I love!
I wish for the best and most yummy, nap-filled, happy holiday to you all! Gobble, gobble!
November 23, 2011
DIY Tutorial Series Creating a Lightbox Part III of III

Sadly we have come to the final part in the amazing tutorial series by my mom, and fearless photog, Judi from Judi FitzPatrick Studio. I hope you've all enjoyed this series as much as I have! I really can't wait to start experimenting with various lamps and light sources with my lightbox so I can get some amazing product photos of my smaller items.
The final part of the series is all about the photos so read on and enjoy and don't forget if you're looking for some unique holiday cards for your friends and family my mom carries lots of options in her shop, the cute snowman up there is available as Snowman Wishes Handmade Holiday Card so read through the tutorial then stop on over to Judi's shop for your holiday cards today!
**************************************************************************
Hi Readers,
This is the third and final installment on product lighting. First you learned how to create a simple light box. Next you learned at least one way to light up the box.
Now that you’ve got a well-lit place to shoot your product, it would be best if you could do that without the possible blurry shot that sometimes occurs from hand-holding the camera. But suppose you have no tripod, and don’t want to invest in one for a few product shots. You're about to learn that you don’t necessarily need one.
The bottom line is you just need a flat, level, stable surface on which to place the camera. So, you might think – “why not just put the camera on the table in front of the box and take the shot?” Good idea, except this is probably not the best angle for your product to be captured.
Instead, there are a couple of things that can be done.
First, you could use books, magazines, boxes or something else to raise your camera to a better height. Doing this so that the camera angles downward works really well to get the best shot, just be sure the camera is stable. You don’t want it to go sliding downward while snapping the photo, or worse yet, falling to the floor.
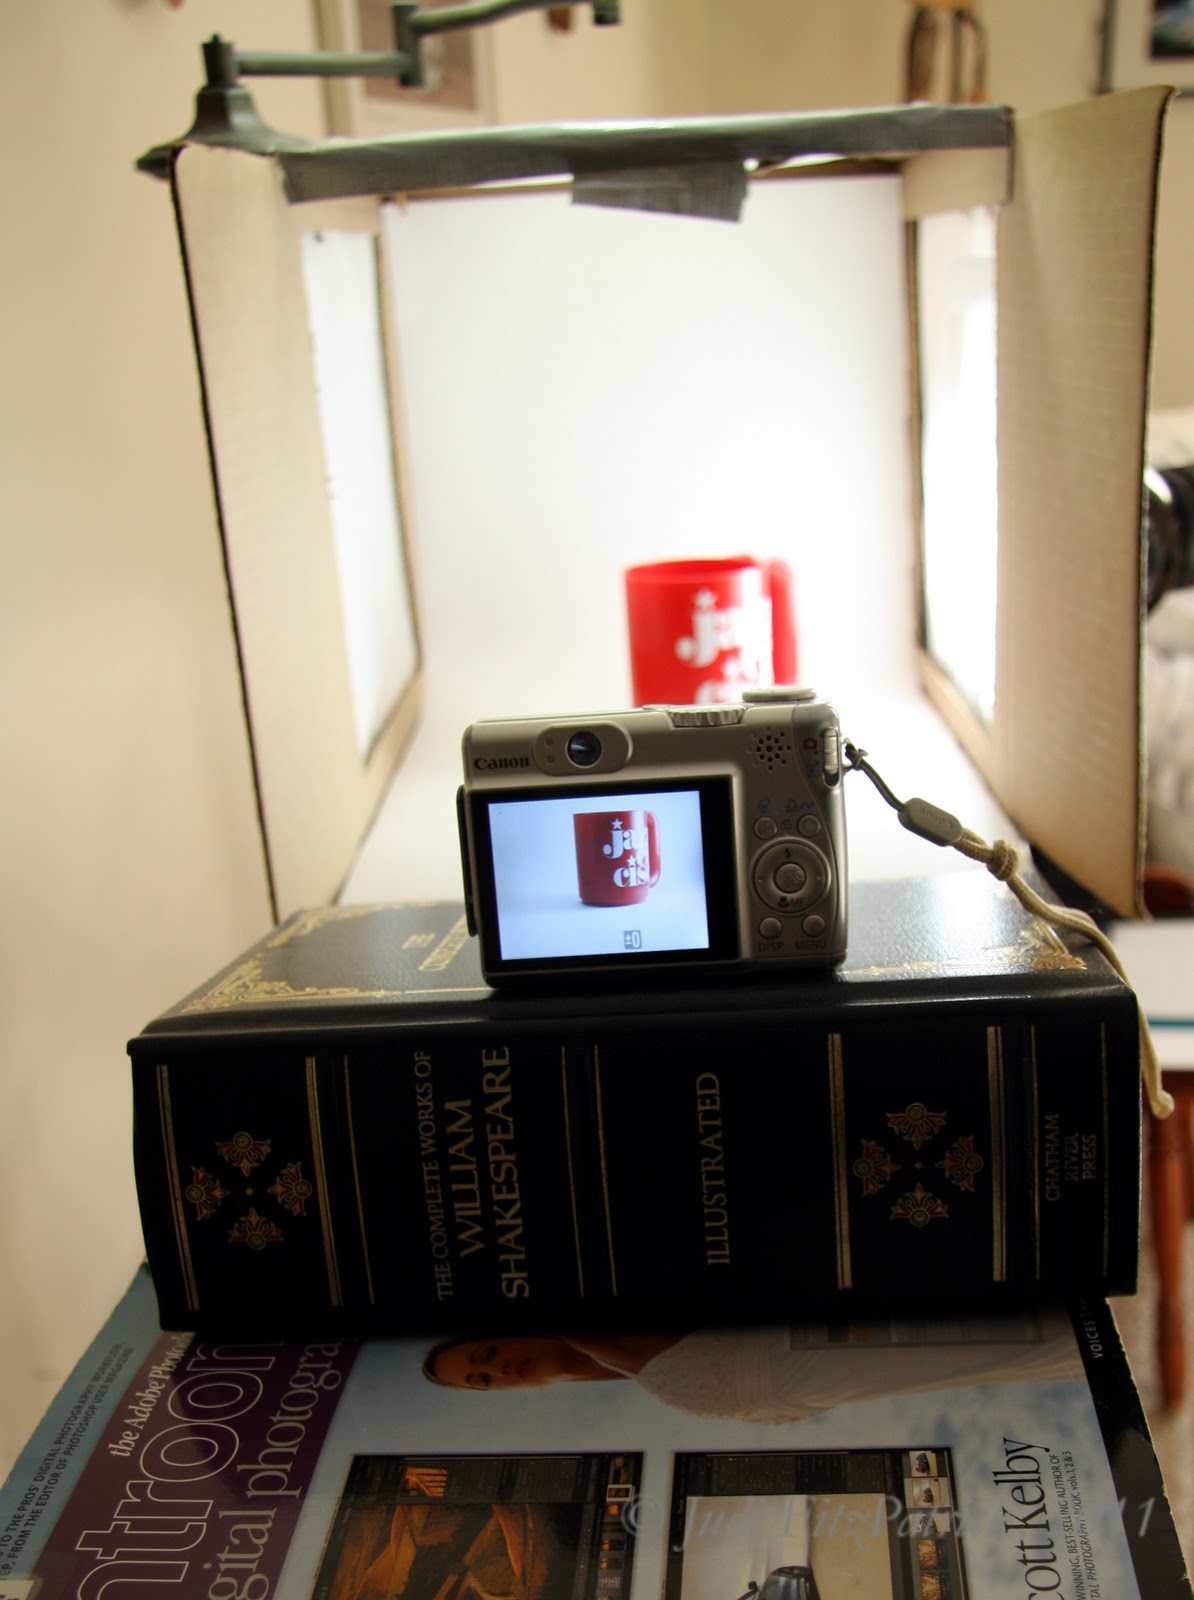
Second, you could angle the light box by raising the back edge from a few millimeters to a couple of inches. Raise the box with magazines, pieces of wood, or anything else that gives a useful angle in relation to the camera. This can be done alternately or in addition to the above suggestion
Place the product in the box, turn on the lights (if CFLs, let them warm up for a few minutes to obtain maximum light), aim and focus the camera, then take the shot. If your camera has a time-delay setting, I’d suggest using that. That is one way to avoid camera shake as you press the shutter. If you are fortunate enough to have a remote shutter release, even better – go ahead and use that.
Now you can take product shots anytime of day or night, whatever the weather, even inside a closet if you’re so inclined!

One more thing – you can use some of these techniques to take vacation or family photos in lower light, such as indoors or early morning / late afternoon. Consider placing the camera on the hood of your car, the top of a cement wall, on a porch railing, or any other place at the right height for the shot you want to take. Using either the time-delay or remote shutter means you can be in the shot with the other people or the scenery! Pretty cool, huh?
I hope you enjoyed this series and find it useful for taking better pictures.
Thanks once again to Jenn for inviting me to be a guest writer on her blog!
Peace to all,
Judi
**************************************************************************
Hello awesome! I don't know about all of you but I'll be making these tips work for me in product and people shots this holiday season. Thanks again to my mom for putting together such an informative and easy to follow guide to creating and using a lightbox. You can find Judi's tips and beautiful photography all over the web:
Etsy - http://judifitzpatrick.etsy.com/
Zazzle - http://www.zazzle.com/judifitzpatrick
RedBubble - http://redbubble.com/people/judifitzpatrick
Blog - http://judisjems.blogspot.com/
••••••••••••••••••••••••••••••••••••••••••••••••••••••••••••
To read the entire series...
Part I of III - Creating the Lightbox
Part II of III - Illuminate the Lightbox
Part III of III - Camera Position
November 22, 2011
Tuesday Tip of the Day Travel Safely
The busiest travel day of the year will be upon those of us in the United States tomorrow as we dash to and from the homes of loved ones to spend some quality time together on Thanksgiving. All that travel means we have the ability to enjoy each other's company but also that our senses should be heightened to avoid any major issues as we make our way around town.
For those of us on the road, there are some things we can do today to make sure tomorrow's travel goes as smoothly as possible.
Check tire pressure and tread wear - A tire pressure gauge is inexpensive, easy to operate, and can be picked up at most convenience stores or pharmacy type locations. Consult your owner's manual for the correct pressure rating for your car and inflate/deflate as necessary. Use the old penny trick to determine the tread wear - If you can see Lincoln's head then its time to get new tires. Better to buy them today than be waiting for a tow truck tomorrow!
Make sure your fluids are full and fresh - In my Toyota the suggested oil change interval is every 5,000 miles and I'm usually pretty good about sticking to that schedule. Getting the fluids in my car turned over and refilled at that rate means the car will be running at its best. A cur running that well gets better gas mileage and saves money overall.
Keep things squeaky clean - There's nothing more distracting than trying to drive for hours on end with a car full of hungry, screaming family members who can't stop talking about the smell of the apple pie in the back seat. And those are the grownups! Changing lanes with people pining away over cranberry sauce is difficult enough but if those windows and mirrors are grimy it sure won't help matters much. Grab some old newspaper and a spray bottle full of a vinegar and water solution for the cleanest possible glass surfaces inside and out.
Plan in advance - In today's day and age everyone seems to have a GPS device either in the car or on their phone and we rely on these tools to get us to our destinations safely and efficiently. But what if we get rerouted and left to figure it out on our own? Those of us in the northeast understand because it happens more often than not. Best plan of attack is to map out the route and review exactly where you're going before ever getting in the car. Make a mental note of the major roads/freeways along the way and any surprises that come up in route can be handled with no worries.
Fill up - You may be thinking of nothing more than filling your belly on Thursday but make sure to fill up your car's gas tank now just in case there isn't an open station where you thought there might be. Freeways and major interstates are likely to have open service stations along the way (even on Thanksgiving) but lines could be long so why wait if you can get it out of the way beforehand? That's ten minutes sooner you can be eating mashed potatoes and gravy!
And there you have it! Just a few quick things we all can do when traveling by car on our way to celebrate Thanksgiving dinner with family and friends. I hope these tips help you stay safe and secure!
What are your tips for smooth and easy holiday travel?
November 18, 2011
Friday Feature Finish Mountain and Cactus Mural
Last summer, before moving to the southwest, I felt inspired by a photo I saw that my mom took of some small hilly mountains in Arizona. The photo was primarily interesting because of the shading and shadows the mountain range displayed as well as the sprinkling of boulders and saguaro cactus. I pulled out one of my Mighty Boards and started sketching.
The picture stayed taped to my studio table and I referred to it to get the sun angle as well as a few examples of saguaro and how their arms jutted out in random shapes and sizes. The landscape was truly beautiful to me and still after being here for almost six months it doesn’t seem like it will ever get old.
Bright blue sky, tall and majestic mountains, bursts of color and a lot of natural inspiration made this mural sample come to life.

I’m considering getting this scanned and making prints for sale as I feel it’s one of my best paintings that I’ve done in a long time. I used to tell people that I couldn’t really do mural, that my creativity came in a different way, but after painting this piece I felt more confident in my abilities and would like to explore doing more acrylic work. Perhaps the next one I’ll do on canvas!
And now, to get inspired again…
November 16, 2011
DIY Tutorial Series Creating a Lightbox Part II of III
Morning readers! This morning marks Part II of the DIY Tutorial Series on the beauty and benefits of creating and using a lightbox for product photography. Once again my mom came through with a terrific tutorial that is easy to follow and should really help many of us get our beautifully handmade items out of the shadows and into the spotlight!
Enjoy!
*********************************************************
Happy Wednesday,
Thanks again to Jenn for allowing me to be a guest contributor to her wonderful blog.
Last time I gave you instructions for how to make a simple light box which can be used for photographing small products. But, what good is a light box without light? And who wants to spend a fortune for the lights when the box was almost free?
What you’ll need:
- Two (or three) lamps
- Daylight bulbs appropriate for the lamps
- Table, ironing board, or other level surface
What I Use:
- The lightbox you made last week
- One floor lamp with bendable arm
- One flexible-neck clip-on desk lamp
- Compact fluorescent bulbs for each – labeled Daylight or Cool Natural Light (Do not exceed wattage recommendations of the individual lamp)
- Ironing board

How I Do It:
- I place the box on the ironing board.
- I clip the desk lamp onto the ironing board and adjust the neck so that the light source is close to, but not quite touching, the tissue paper on either the left or right (Depending on my mood or the side of the item which will look best lit. If you have two desk lamps, feel free to use them both.).
- I move the arm of the floor lamp so that the light source is above the center of the top of the box. (You may have to raise the light box using books or other flat, level items in order to have enough light entering the top of the light box.)

How Should You Do It?
You’re going to have to think “outside the (light) box” here. The idea is to get as much light aimed inside the box as possible, while keeping the box level and secure. The beauty of an ironing board is it can be adjusted up or down to fit your needs and reach the light source more effectively!
If you cannot find daylight bulbs, just be sure all of the lamps you use contain the same types of bulbs, then set the white balance on your camera accordingly.
If you must use a table lamp, remove the shade. You might have to put the lamp on a chair and the box on the dining table to get the light source at the right height.
But that's all there is to it, nou’ve now lit up your box and are ready to photograph!

Next time, how to set up your camera to get the best pictures using your new set up.
Peace to all,
Judi from Judi FitzPatrick Studio
*********************************************************
Please visit my mom's shops or blog below in order to see how she uses her lightbox to photograph her smaller products. Then be sure to get back next week as Part III brings this series to a close with some amazing shots you will NOT want to miss!
Etsy Shop - http://judifitzpatrick.etsy.com/
Zazzle Shop - http://www.zazzle.com/judifitzpatrick*
RedBubble Shop - http://redbubble.com/people/judifitzpatrick
Blog - http://judisjems.blogspot.com/
••••••••••••••••••••••••••••••••••••••••••••••••••••••••••••
To read the entire series...
Part I of III - Creating the Lightbox
Part II of III - Illuminate the Lightbox
Part III of III - Camera Position
Enjoy!
*********************************************************
Happy Wednesday,
Thanks again to Jenn for allowing me to be a guest contributor to her wonderful blog.
Last time I gave you instructions for how to make a simple light box which can be used for photographing small products. But, what good is a light box without light? And who wants to spend a fortune for the lights when the box was almost free?
What you’ll need:
- Two (or three) lamps
- Daylight bulbs appropriate for the lamps
- Table, ironing board, or other level surface
What I Use:
- The lightbox you made last week
- One floor lamp with bendable arm
- One flexible-neck clip-on desk lamp
- Compact fluorescent bulbs for each – labeled Daylight or Cool Natural Light (Do not exceed wattage recommendations of the individual lamp)
- Ironing board

How I Do It:
- I place the box on the ironing board.
- I clip the desk lamp onto the ironing board and adjust the neck so that the light source is close to, but not quite touching, the tissue paper on either the left or right (Depending on my mood or the side of the item which will look best lit. If you have two desk lamps, feel free to use them both.).
- I move the arm of the floor lamp so that the light source is above the center of the top of the box. (You may have to raise the light box using books or other flat, level items in order to have enough light entering the top of the light box.)
How Should You Do It?
You’re going to have to think “outside the (light) box” here. The idea is to get as much light aimed inside the box as possible, while keeping the box level and secure. The beauty of an ironing board is it can be adjusted up or down to fit your needs and reach the light source more effectively!
If you cannot find daylight bulbs, just be sure all of the lamps you use contain the same types of bulbs, then set the white balance on your camera accordingly.
If you must use a table lamp, remove the shade. You might have to put the lamp on a chair and the box on the dining table to get the light source at the right height.
But that's all there is to it, nou’ve now lit up your box and are ready to photograph!

Next time, how to set up your camera to get the best pictures using your new set up.
Peace to all,
Judi from Judi FitzPatrick Studio
*********************************************************
Please visit my mom's shops or blog below in order to see how she uses her lightbox to photograph her smaller products. Then be sure to get back next week as Part III brings this series to a close with some amazing shots you will NOT want to miss!
Etsy Shop - http://judifitzpatrick.etsy.com/
Zazzle Shop - http://www.zazzle.com/judifitzpatrick*
RedBubble Shop - http://redbubble.com/people/judifitzpatrick
Blog - http://judisjems.blogspot.com/
••••••••••••••••••••••••••••••••••••••••••••••••••••••••••••
To read the entire series...
Part I of III - Creating the Lightbox
Part II of III - Illuminate the Lightbox
Part III of III - Camera Position
November 15, 2011
Tuesday Tip of the Day Protect Yourself Online
Over the past few weeks I’ve been taking a class in school called Computer Literacy. At first I thought the class was going to be all about how to turn on my computer, as it was a 100 course, but I’m actually learning a lot and enjoying it as well as the surprising challenge it provides!
One of the things I’ll be doing in class is completing a fairly extensive research project for the final which will include charts and a PowerPoint presentation. We were given a list of topics to work on and I decided to go with studying copyright in digital media. My plan was to study things like iTunes, Netflix, and blogs to see just what protections we have in place for our original content. Now I’m rethinking the focus.
A couple days ago I read an article about a few hackers in, I believe, Russia who hacked online click ads with a malware program that allowed them to make millions of dollars that wasn’t theirs. It was quite a scam and although they were caught I can imagine the people who were involved didn’t feel like their "genius" was used in the right way. I agree and it brought up my change of heart on the final for my class.
If we click on ads, if we click on links, if we click on pictures in Facebook how can we really know just what we’re clicking? How can we protect ourselves and our secure information? Is there a way to provide content for the world while still ensuring we keep our privacy intact? These questions and more came up in my own mind and I thought it would be a good reminder to just throw out there to everyone to keep a close eye on your stuff.
Try to stay off of strange sights, don’t click links, ads or pictures from sources you don’t trust and never (read: never, never, NEVER!) give your personal information out to anyone you don’t know. One of the quickest ways to ensure you’re more secure online is to always look for 'https' instead of standard 'http' in the address line of the site you’re on. For example, my blog up there doesn’t have the s because it isn’t a secure socket.
If I were to sell products here I’d have to ensure that s was there so my customers would feel secure in knowing their information was safe. For the simple act of reading a blog it isn’t quite as big a deal.
So the long and short of it is be aware of the dangers that are out there and study up on the latest in ways to avoid falling victim to the theft of your personal information. I’ll be sure to provide additional tips as I finish my project in the next couple weeks, I imagine it will prove quite illuminating!
Have you encountered any weird things online recently that made you question your privacy?
November 9, 2011
DIY Tutorial Series Creating a Lightbox Part I of III
Our latest DIY Tutorial is the first of a trilogy on the beauty, benefit and creation of your very own light box for product photography. The series is coming to you direct from Judi FitzPatrick Studio, my favorite Photog! I can't begin to thank my Mom enough for contributing to this series, her shop photos always come out so beautiful and I begged her to do this writeup to share her knowledge! Enjoy :-)
*********************************************************
Good Day Readers,
First I want to thank Jenn for asking me to write a guest post on creating a light box. These can be very useful for photos of small products.
Do you need to photograph small products? Do you want to do this indoors, but can’t find a spot with good light? Or, maybe you need to do your photographing after dark? One solution is a light box.
Rather than spending a lot of money to buy a manufactured one, why not make your own? It’s easy, inexpensive, and fun to do!
What You Need
- One fairly heavy-sided cardboard box – the one I used** was approximately 12 inches (30-35mm) on each side.
- At least 3 sheets of white tissue paper such as used for wrapping gifts
- Scissors
- Box cutter or other sharp bladed knife
- Duct tape or other wide tape
- White and/or black poster board
- Pen or marker
- Tape measure or ruler
How to Create the Box

Be sure that one end of the box is taped shut and the other remains open. On this open end, cut off two of the opposing flaps, but leave the other two in place.
Place the box so that the end with the 2 flaps is facing you, and the flaps are to your left and right. From here on I will call this the front.
Place an X or other mark on the left side, right side, and top. This will complete the orientation of your box.
On the 3 sides with the X marks, draw a border or frame on each, 1 to 1.5 inches from each edge – so you will be drawing a square (or rectangle), just smaller than the size of a side, on each of 3 sides.

With a box cutter or other bladed tool, such as an Xacto Knife, very carefully cut on those lines, leaving the frame around each side. These openings will allow light into the interior of the box.
You will want to diffuse your light source, so this is where the white tissue paper comes in. Cut three pieces of the paper, one for each side, larger than the openings you cut, but smaller than the size of the box side/top. Using the wide tape, attach one piece over each of the openings that were just cut.
Your box should now look something like this:

Position the box with the front facing you, with the two flaps on either side, and the left, top, and right sides those with the tissue paper.
Inside the Box
- Measure the depth of the bottom of the box (front to back).
- Measure the height of the back of the box.
- Add these measurements together.
- Add a few inches for good measure (pun intended) & note it on a piece of the cardboard cut off (scrap)
- Measure the bottom of the box from left to right (width) & subtract about ¼ - ½ inch.
- Mark and cut a piece of poster board to match these two measurements.
FYI, the poster board I had was 28 x 22 inches. I left the 28 for the long measure and used 11 ¾ for the short measurement (left to right.) This allowed an extra 3 or so inches to hang out of the front of the box.
- Slide the poster board into the box and gently curve it upward close to the top – push it in enough to make a large base surface but not so far that it would crease.

That’s it! You now have a DIY light box. Next time, how to inexpensively light it up!
Peace to all, Judi
Judi FitzPatrick Studio Etsy Shop
Judi FitzPatrick Studio Zazzle Shop
Judi FitzPatrick Studio Red Bubble Shop
Judi FitzPatrick Studio Blog
Difficulty rating is 1, but not recommended for young children due to the use of sharp bladed tool.
** Please note: Because Judi had already created her lightbox long before I asked her to contribute this article, the first 3 pictures are of mine so they may look different than the 4th box picture, collaborative effort!
••••••••••••••••••••••••••••••••••••••••••••••••••••••••••••
To read the entire series...
Part I of III - Creating the Lightbox
Part II of III - Illuminate the Lightbox
Part III of III - Camera Position
November 8, 2011
Tuesday Tip of the Day Make a List
I'm getting ready to go on a two plus week trip back to Massachusetts to visit family and go to my twenty year high school reunion. Yikes. I know that people older than me will laugh at me for saying I feel old, people younger will shake their heads in disbelief that anyone could be out of high school for twenty years. But all I'm thinking about are the lists of stuff to get done before I leave.
Now it isn't like I'm going to another country where I have no clue where things are located or how to acquire stuff if I need it. Though at times I still feel like my hometown is a foreign country, there are places that I know intimately after three decades of living there. Clearly if I forget to bring something with me I can just pick it up after arriving right?
Well sure, but that doesn't mean I want to forget anything, I try to be Green and that means not buying stuff in duplicate, so I have made a master list of stuff to pack and stuff to do before I hit the road.
My list includes everything from calling my car insurance company to inquire about the discount I can get by being a member of Golden Key, to returning my library book, to taking out the recyclables. All of the things on it are prioritized in a manner of true need. For example, calling on insurance is something I can do when I get there so it isn't a 'Must', but printing boarding passes is kind of vital to getting on the plane in the first place so it is on the 'Must' list.
I separated the list into categories of 'Must', 'Should', and 'Would Like To' do before I take off. Almost everything is crossed off and I'm feeling less stressed about the 2500 mile journey away from my current home back to my old one.
Well, less stressed about the stuff to get done before leaving anyway...
Sadly "work out so I don't look a day over 18" didn't make it to any of these lists and instead I had to settle for "go shopping for an amazing outfit" which I hope to do later this afternoon. Shopping only made it to the 'Should' list seeing as though it isn't exactly vital to be the super me just because I haven't seen most of these people face to face in twenty years. If it gets done then great but maybe I should save it to do with some friends when I return to Boston instead...hmm...
Don't forget to get back over here tomorrow to read the first of a three part series on lightboxes written by the one and only Judi FitzPatrick of Judi FitzPatrick Studio fame! It promises to be a great tutorial and hopefully will help all of you to snap even more gorgeous pictures of your beautiful handmade items.
November 1, 2011
Tuesday Tip of the Day - Never Stop Learning
Most of you know that I'm an English student and getting my degree at an online University. When I first signed up I was told the minimum requirements for hardware and software and I either met or exceeded the needs so felt I was in the clear. That was until I started my current class and learned I would have to upgrade my software to the latest version of MS Office.
At first I panicked because I already know how to use Word / Excel / PowerPoint in the version that I have and throwing anything else into the mix while studying and creating a pretty extensive research project seemed overwhelming at first.
But then it hit me, its all about learning more.
Knowing the 2010 version will make me more marketable, better equipped for future releases, and able to better communicate across a modern resource instead of the old and antiquated one I was still toiling away on before. It is actually liberating to think I'll have a new skill in the next five weeks.
Or at least Skill 2.0 :-)
So school may take a little bit of a front seat but I hope that the learned content will be able to work into my daily life either as a business owner or as a writer and student!
What new things are you learning right now?
October 31, 2011
Herban Luxe Giveaway Winner was Yours Truly!

I entered her contest after reading about it on Facebook. Not a fan of hers on Facebook yet? You should be! Myra frequently has giveaways and talks about all kinds of super cool business tips, both for her own successful business as well as hints and advice for the readers of the EcoEtsy blog. And you can always find out about the latest trends in makeup.
But not just makeup…handmade, eco-friendly, happy to put it on your face because it will never contain a bunch of nasty carcinogens or crap, makeup!
I was floored to win these amazing full sized Roller Babes eyeshadows – one in Sunset which is perfect on my lids, the other in Oriental which goes right on my brow line and makes my eyes really pop! On top of that I also received her newest item to her collection, the Moscato Lipstick. It goes on great, its smooth and soft, and really lasts. Not to mention it looks perfect with my lighter toned skin and almondy brown/red hair. But it is just one of those colors that kind of works on everybody!

Everything arrived in that reused package ^ there. It was all wrapped up nice and neat so nothing would spill, padded to ensure against breakage, and there was even a little bonus mineral mascara in the bag! Woo hoo!
Myra you just simply rock and you’ve truly inspired me to start thinking about what kinds of fun items I could give away from my arsenal of eco-friendly accessories...
Maybe iPod cozy cases? A clutch purse? Perhaps a set of faux granite coasters?
What would you love to try to win that Chucka Stone Designs creates? Would you like to see something totally different than the above mentioned items?
Tell me about it in the comments then be sure to get out and follow Herban | Luxe, try the make up and fall in love with Myra's shop!
October 26, 2011
DIY Tutorial Series Making Cellophane Packaging
Today’s tutorial comes from Martina at Nature's Art Melbourne and in it she shares how to take those scraps from cellophane that we all come across and turn them into beautiful, custom packaging for your items.
Materials Needed
Item to package
Description of Materials
Cellophane can come from flower bunch covers - use the top bit which didn't get greased, covers of bought cards, chocolate covers, protective covers from all sorts... or you buy it in a roll and cut it in the right size.
The product I am packing in the tutorial is from my shop, I Am Happy to Be Me Zine
•••••••••••••••••••••••••••••••••••••••••••••••••••••••••••••••••••••••••••
Martina also notes…
Thanks for sharing your terrific tutorial Martina!
Interested in contributing a tutorial and having your shop linked?
Simply send a brief description of your process, photos of the steps, and captions to describe each step to chuckastonedesigns at yahoo dot com
Materials Needed
Leftover cellophane, cleaned and dried
Vacuum sealer machineItem to package
Description of Materials
Cellophane can come from flower bunch covers - use the top bit which didn't get greased, covers of bought cards, chocolate covers, protective covers from all sorts... or you buy it in a roll and cut it in the right size.
The Vacuum bag sealer is normally for the household and used to seal bag before freezing - it sucks the air out - which we do not need in our case it just makes the noise of sucking it out but the sealing is the beauty of this little thing.
The Process
 |
| Gather your items - Cellophane remnants, little book to protect, vacuum bag sealer |
 |
| Cut cellophane (if necessary) if not flat - in this case two sides are close anyway as it comes from a chocolate box I just cut the bottom off |
 |
| Seal the bottom / one end closed - slip book in tight to the seal |
 |
| Seal 3rd side - seal as close to the bookend as possible |
 |
| Sealing in action - wait until green light turns off on the sealer ( few seconds) |
 |
| Sealed - remove off the machine, note the extra cellophane above the seal will be removed (save for another small item!) |
 |
| Cut 4th edge - The open end, leave around 1 inch to have enough to fold under |
 |
| Bend edge over and close with sticky tape (you could also seal the fourth side closed, but I prefer sticky tape as the customer does not need sciccors to open the bag) |
 |
| Packed neat, Upcycled, Green and ready to go! |
•••••••••••••••••••••••••••••••••••••••••••••••••••••••••••••••••••••••••••
Martina also notes…
- You can seal plastic as well - is a matter of having a try on the plastic (if it is thick enough or too thick)... there is nothing to loose, only to win.
- Even bought cellophane covers for cards can be resized - for example I recycle envelopes in funny sizes for handmade cards and I can seal them and they look professional.
- Happy cellophane hunting!
Thanks for sharing your terrific tutorial Martina!
To see Martina’s insanely gorgeous jewelry and other fantastic handmade items please visit her shop – Nature's Art Melbourne
Interested in contributing a tutorial and having your shop linked?
Simply send a brief description of your process, photos of the steps, and captions to describe each step to chuckastonedesigns at yahoo dot com
October 25, 2011
Tuesday Tip of the Day -- Stay Focused and Stay Fresh
Post is going up quite late today as I am finally about caught up after being out of town last week. Sorry for that but I won't make you wait another second for the Tuesday Tip of the Day. Today's is "Keep it Fresh"
I was reading quite a bit of stuff lately on how often to update your website or blog for maximum effectiveness. Readers want to know that you are active online, they don't love going to a blog or website in July and seeing the announcement that you're having a lovely winter. Content should be current and relevant and the majority of places say that writing a daily blog is ideal while a website only needs updating every quarter.
The blog thing sounds good, I'm trying to get mine back to 5 days a week right now in fact and that's my ultimate goal so I can pretty much work from anywhere everyday. But the website suggestion seemed a little low where you'd only change the information every three months.
Now I don't get over to my site daily or even weekly but if I create some new items I think its smart to post photos of them. Sometimes the copy needs to get a mini overhaul too. But with so much stuff to keep up with I don't beat myself up if I can only get to one or the other of those tasks each time I'm updating. In my opinion, once a month is a far more realistic time between updates.
So in an effort to stay fresh on my blog, it seemed like high time to get an updated About page over here this morning. Feel free to check it out when you have a second! This information will eventually filter through to the website in the next week or so and I'm excited to have gotten a more realistic picture of who I am and where I started, not to mention how I've gotten here, shared with the online world. The story is personal and I think it better represents me and my brand.
How long has it been since you've updated the copy or photos on your own website or blog?
October 24, 2011
The Results of the Social Media Poll are in!
And the winner by an ever so very slight margin was:
Having a blog / website!

So I started thinking about the result over coffee this morning. I have been kicking around integrating my blog and website into one place in November when my hosting expires. Everything filtering into one place is good for reduction of updating requirements.
Because my goal is to ensure my Etsy shop runs smoothly even when I take on additional responsibility of writing (either for my novels or for a couple blogs I want to guest post for, plus this blog and my personal one), the more that can be reduced outside of that stuff the better.
I was pleased to get so much great advice on other locations like Facebook (a very close runner up at 2nd), twitter, LinkedIn, other. Between participation in team forums, posting links, and the like, my social media investment was higher than the time I spent actually creating things. And as far as I'm concerned, that ain't good.
Mary from Herban Lifestyle suggested that I have everything filter into each other. I was already doing this with my blog posts but not everything else. Now everything auto populates but I only have to post things once. Curlymonkey commented that everything is tied to her website and not outside social media because its a place she could still have and approach brick and mortar locations. That's a great point as I consider amping up my interest in consignment. Sonya at Kanelstrand felt it was a good idea to just have something and work it so it works for you, Bee at The Wooden Bee agreed that everything working together was a good call, and Fia at Fianaturals was in the majority voting for blog/website.
Thanks for the votes, comments and encouragement ladies! For everyone else who voted under cover of darkness thanks so much to you as well. This has really helped me to narrow down and prioritize.
Flickr stays but I am not active on there, truly I only have it so I can have a nice Gallery Page here on the blog. I have decided not to join other sites that have no bearing on my creativity but still suck time (Pinterest, Google+, ) and a few other things had to also fall away. Interestingly twitter only got one vote. Updating that is mostly automated now so I'll keep it but likely won't participate very much more than I currently do.
So there it is, I'm just happy to know that what I was doing and how I was narrowing down was in the ballpark of smarter business sense!
Thanks to everyone who participated and now I'm back to regular posting!
October 17, 2011
New Poll at the Top of the Post Please Read this and Click Quick!
Good morning my friends and clients! It has been a crazy whirlwind over the past week or so and my head is swimming and spinning with all of the ideas and business related goals I have set out for myself. So here's the thing, I'm very torn on where I need to focus the most attention and am asking for your help to narrow it down.
As you can see I've inserted a little poll at the top of my page. The poll only allows you to choose one response, the question is:
Basically it comes down to this...
Over the weekend I had a little existential artist crisis over on my personal blog. Now I need to SERIOUSLY DISCLAIM the link because Random Lunacy is the place where I get all snarky and bitter sometimes, I curse a lot and a some people might find that unprofessional. So if that person is you, please don't read it. But that site is also an honest portrayal of who I am, not just as an upbeat business owner, and I personally feel that we should all be able to vent and say what's on our minds without fear of repercussions from anyone.
This is the part where you learn about me that I live with no regrets. I'm trying to also live fearlessly lately too, though that is much more challenging to achieve sometimes.
Anyway, that personal post on Saturday was me essentially spinning around trying to make sense of the fact that I have been going to school now with straight A's and loving the fact that I get to write all week for school, but missing the creative side that isn't just essay writing. Something drew me to something else and before I knew it I had found a pretty cool looking agent that I submitted a query to for my completed manuscript.
I began tossing around my business, my dedication level to certain aspects of it, and I came to the conclusion that while I love to paint, I love to write even more so it was time to let some aspects of my business go.
On top of the fact that licensing is very complicated & difficult here in Arizona, I think that it is time to admit my business ventures outside my home have been less than profitable and not functioning the way I've wanted or strived for the past 4 years. It is time to let go of part of the business and solely focus on my smaller items, my home decor line, and upcycled, repurposed, recycled pieces.
In flip-flopping my time, I will free up about 20 hours a week to focus on my writing while still maintaining a shop and my 4.0 GPA. As for family who I've already told I'm going to do projects (for example my step-MIL's niche shelves) that's still happening, but for anything else...
Check out the wares in my shop!
Now, with this in mind and my part time dedication of time to my shop, I feel its important to get the most impact out of what I do while reducing the things I simply do not use at all. The poll asks you to select one social media outlet where time is spent that is truly essential to any business. My question relates to both networking for connections and increased views and sales. I included a spot for 'Other'. If you choose that option I ask if you could toss a comment here in the post as to the where and why.
Anyone who would like to share why the media they click has worked the best for them I'd greatly appreciate it! I still intend to create treasuries and take an active role in the team forums as the people I've met have been vital to my sanity at times (I'm looking at you Karen, thanks!) and I know that networking is crucial to any smart business owner. But in an effort to reduce my consumption of daily drivel that gets me no further ahead I'm looking to just be smarter about it all by nixing things that aren't crucial.
So this long winded post is going to stay at the top until the poll closes next Monday.
Be on the lookout next Wednesday, November 26, for our first DIY Tutorial submission coming in from Martina at NaturesArtMelbourne on how to use those cellophane wrappers everyone throws away as packaging. You will not want to miss it!
Then next Friday its back to Feature Finish and I promise you're going to love that too!
Have a great week and get voting! Thanks :-)
As you can see I've inserted a little poll at the top of my page. The poll only allows you to choose one response, the question is:
What social media is ESSENTIAL to all businesses regardless of product/service type?
Basically it comes down to this...
Over the weekend I had a little existential artist crisis over on my personal blog. Now I need to SERIOUSLY DISCLAIM the link because Random Lunacy is the place where I get all snarky and bitter sometimes, I curse a lot and a some people might find that unprofessional. So if that person is you, please don't read it. But that site is also an honest portrayal of who I am, not just as an upbeat business owner, and I personally feel that we should all be able to vent and say what's on our minds without fear of repercussions from anyone.
This is the part where you learn about me that I live with no regrets. I'm trying to also live fearlessly lately too, though that is much more challenging to achieve sometimes.
Anyway, that personal post on Saturday was me essentially spinning around trying to make sense of the fact that I have been going to school now with straight A's and loving the fact that I get to write all week for school, but missing the creative side that isn't just essay writing. Something drew me to something else and before I knew it I had found a pretty cool looking agent that I submitted a query to for my completed manuscript.
I began tossing around my business, my dedication level to certain aspects of it, and I came to the conclusion that while I love to paint, I love to write even more so it was time to let some aspects of my business go.
On top of the fact that licensing is very complicated & difficult here in Arizona, I think that it is time to admit my business ventures outside my home have been less than profitable and not functioning the way I've wanted or strived for the past 4 years. It is time to let go of part of the business and solely focus on my smaller items, my home decor line, and upcycled, repurposed, recycled pieces.
In flip-flopping my time, I will free up about 20 hours a week to focus on my writing while still maintaining a shop and my 4.0 GPA. As for family who I've already told I'm going to do projects (for example my step-MIL's niche shelves) that's still happening, but for anything else...
Check out the wares in my shop!
Now, with this in mind and my part time dedication of time to my shop, I feel its important to get the most impact out of what I do while reducing the things I simply do not use at all. The poll asks you to select one social media outlet where time is spent that is truly essential to any business. My question relates to both networking for connections and increased views and sales. I included a spot for 'Other'. If you choose that option I ask if you could toss a comment here in the post as to the where and why.
Anyone who would like to share why the media they click has worked the best for them I'd greatly appreciate it! I still intend to create treasuries and take an active role in the team forums as the people I've met have been vital to my sanity at times (I'm looking at you Karen, thanks!) and I know that networking is crucial to any smart business owner. But in an effort to reduce my consumption of daily drivel that gets me no further ahead I'm looking to just be smarter about it all by nixing things that aren't crucial.
So this long winded post is going to stay at the top until the poll closes next Monday.
Be on the lookout next Wednesday, November 26, for our first DIY Tutorial submission coming in from Martina at NaturesArtMelbourne on how to use those cellophane wrappers everyone throws away as packaging. You will not want to miss it!
Then next Friday its back to Feature Finish and I promise you're going to love that too!
Have a great week and get voting! Thanks :-)
October 14, 2011
Friday Feature Finish Painted Wood Floors
Been working on items for the shop like mad and have some last minute weekend wrap-up to do so today's Friday Feature Finish will be short and sweet. Today's finish is Painted wood floors!

The plumbing had burst in this older east coast home and the carpets weren't salvageable. But underneath were semi decent hardwoods. They weren't in good enough shape to sand and restain so my contractor decided painting them would be the way to go.
It was a super simple solution, inexpensive and easy to maintain in the long term. Although this home only made use of one color in a flooring specific paint there are many fun things you can do with painted floors from checkerboard patterns to faux throw rugs, edging stencil to faux polished concrete look. The possibilities are endless!
I completed all painting in the photo above from floor to ceiling and everything in between. This was a whole house renovation and I was totally grateful for the opportunity to work on the entire project floor to ceiling, trim and walls.
October 13, 2011
Paper Covers Rock Treasury Featured on Etsy Treasury Hunter!
Just found out this morning that a collection I curated a few days ago has been featured over on the blog Etsy Treasury Hunter. Wowza! I am beaming with excitement right now seriously!

Have you checked out their site yet? I just discovered it when a teammate shot me a message to let me know a treasury she had curated with one of my items in it (thanks again!) was featured. Here's the deal...
There's a tab for Submit a Treasury at the top of the blog. Go there and fill in the information.
Yup, that's all you do! However, the site is busy and has a healthy following so there will be competition for submisions and no guarantee you will be featured. There is a limit to 3 submissions within a 24 hour period per person and that seems reasonable so everyone has a chance to try! The site has over 425 followers noted on the Google widget and who knows how many email subscribers so you'll be sure to get your favorite items in front of a nice number of people.
I'm proudly sporting this button now, hooray!
October 12, 2011
Reclaimed Supplies from The Wooden Bee Make Beautiful Faux Granite Coasters

We started communicating about a month ago over on Etsy and I was pleasantly surprised that not only would Bee offer the coolest product (a little more on that later) but that my request for 3" x 3" pre-cut squares could also be satisfied! Hooray!
After a lot of back and forth and some research on my part regarding the product I placed my order and anxiously awaited my box full of goodies. Even though Bee said it could take a couple weeks due to an already existing custom order in line in front of me, I only had to wait about a week and this is what arrived at my doorstep...

- It is a composite material similar to Trex in its durability factor but it is made from PVC
- It is stain resistant
- The lifespan of the product is slated for over 25 years
- It is recyclable
- The company itself is trying to be as Green as possible:
"As a leading provider of green building products, AZEK Building Products actively contributes to the green building movement through education and, more importantly, by offering durable, sustainable building products. Moreover, we are diligently working to develop our own corporate cradle-to-grave building systems that reduce landfill costs, reduce fossil fuel use, and reduce carbon footprint of all our operations and products."Nice!
The product had a slight tooth on it so I lightly wood filled some of the end cut marks that the blade left behind, but left the top and bottom in their original state and got started priming.

The primer from the Chocolate Brown Giani Granite kit that I picked up earlier in the week at Walmart was working beautifully with the composite material. Once the primer had cured for the designated number of hours I applied faux finished granite paint effect to all six sides (drying in between of course) and once that was fully cured overnight the waterborne resin topcoat went on. Two coats of topcoat later and I was ready for the eco-fi Craft Felts I had precut to adhere on the bottom.

The felt went on smooth with a super tacky adhesive that I paint brushed on to avoid lumps or bumps, then I used a rounded rollable item to firmly plant it in place. The side of one of the Giani cans was the perfect size and weight to do the job. Yes folks, sometimes I have to act like MacGyver on a daily basis inventing the perfect tool for the job on the fly!
After the felt had set up for about 6 hours I flipped them over and voila, instant granite coaster set! The benefits of these coasters of course are:
- No stone was quarried to create the pieces
- The mineral paints are low odor and low VOC
- Just like real stone no two will ever be exactly the same
- They are much lighter than real stone (less expensive to ship!)
- Speaking of inexpensive...a foot of granite can run $30 - $100 while these are just $15
- Custom colors, patterns and designs are only limited to your imagination!
Want a custom color? Email me at the address located on my CONTACT page and we can get started on yours today! Thanks so much to Bee for the amazing communication, fantastic product and unbelievably positive and upbeat attitude! I'll certainly be shopping your supplies section again my friend!
October 11, 2011
Tuesday Tip of the Day - A Short and Sweet Suggestion
I love fortune cookies. Not just the cookie itself which has the perfect level of sweet citrusy goodness but also the hidden surprise inside - the fortune! For years I've been collecting these little nuggets of basic, simple truth and today's Tuesday Tip of the Day is one of these fortunes to ponder:
If you continually give, you will continually have.Not much more real than that advice! I hope everyone finds a way to give anything they can today and when you get in return, just be thankful enough to give again!
October 10, 2011
Craft Felts are Eco Friendly and Easy to Work With

A week or so ago when I was at my local Walmart picking up a Chocolate Brown Giani Granite paint kit I stumbled down the crafting aisle. Without thinking too much about it I spotted the black felt I knew was going to be perfect for the bottom of the coasters I'm making out of reclaimed azek (stay tuned for that feature on Wednesday!) and chocolate faux granite.
It went in the cart, I purchased, brought it home and started going to work on the faux finish. As I was peeling the sticker from the felt to begin measuring for the coaster base I noticed a little "eco-fi" symbol and, once I pulled out my magnifying glass, was able to read the reason for the distinction:
"high-quality polyester fiber made from 100% post-consumer recycled plastic bottles"Wow, cool! So of course I immediately set out to look up the company, the product specifically, and determine its Greenness as I wanted to include that information in my shop listing for sure. In even teenier letters that I had to yank out a microscope to read, I saw the name of the company was Foss Manufacturing and they had a website.
After a whole lot of reading I learned that they:
- Are located in New Hampshire
- Are a needle-punch based manufacturer (non-woven)
- Have a mantra - "Do it right the first time"
- Create fabrics for a multitude of industries like medical, footwear, marine, residential, roofing and more
- 10 bottles - 1 pound of fiber. This is huge, consider what a single sheet of craft felt weighs and how many sheets can be made for people just like us who use this material in their everyday products!
- It is colorfast and shrink resistant.
Plastic bottles don't shrink and they never break down completely. They simply flake until they create hazards for wildlife and humans by ending up in waterways or leeching harmful chemicals into the Earth. A product made with eco-fi can help keep some of the 51 billion bottles a year that the US uses from wasting away in a landfill / Pacific Garbage Island for the next 700 years!
Perhaps the processing of the plastic causes emissions, perhaps the overall fact that plastic bottles are still being used is a sad statement on a society that should definitely know better by now. But personally, regardless of the counterarguments (which are reality), I feel great about buying a product that is trying to take all of those sad statements and turn them into happy faces!
When I list my coaster sets in a couple days I'm going to do it with the full knowledge that:
- No stone was quarried to create the granite that I'm offerring
- My product has one of the lowest VOC ratings (as compared to similar products on the market)
- The base substrate (azek) came from a teammate, entrepreneur and reclaimed source
- The 100% post-consumer content the entire piece is resting on will make anyone's drink slide around a little easier!
I'm thinking of naming these sets the Lifecycle Extender Series there is so much awesomeness in them!
I definitely suggest looking into this durable, easy to work with, soft and varied color material for your next project that involves purchasing new Craft Felts!
October 5, 2011
How to Set Up A Payvment Shop on Facebook and Use Etsy CSV File to Populate it - Tutorials by Herban | Luxe
A friend of mine in the EcoEtsy team, Herban | Luxe, was kind enough to put together a great tutorial series of how to create a shop on Payvment (new eCommerce site on Facebook), use your Etsy shop's CSV file to populate it, plus a bunch of other awesome tutorial advice that I could never begin to do justice to explaining!
You can come on over to my Chucka Stone Designs Facebook page and click the Shop Now link under my profile picture to see all the goodies I've stocked in my shop.
Want one of your own? Be sure to watch these tutorial videos explaining how you too can have your Etsy shop items on the the Facebook platform Payvment.
Enjoy!
Read my review of Myra's shop Herban | Luxe
October 4, 2011
Tuesday Tip of the Day -- Five Rules for Effective Time Management
I will admit it, time has gotten away from me in the past. That's the exact reason I started to develop my Five Rules for Effective Time Management and I'd love to share them with you!
I run a company but because I'm a sole proprietor not only do I get to do the wonderful artwork, but I also have the distinct pleasure of being the marketing manager, social media guru, promotional material presenter, research and development testing facility (I must admit this is one of my favorites!), and a slew of other positions that range from mind numbing financial stuff to just having fun.
Not to mention, I like an added challenge.
For those of you who don't know, I'm a student, currently pursuing a degree in English and taking classes online. My wonderfully glorious husband is awesome and supporting our family while I finish school. Yea! Three cheers for Matt!
But if you've ever met me, know me, have had a brief encounter with me...etc., etc., etc...you know there is no way I could let myself get bored and not contribute to the family. Essentially there's no way I wouldn't do some kind of work. So I've been pursuing my Chucka Stone Designs Shop with full force!
I try to blog a couple times a week, I curate collections and inform the sellers they've been included, I create my own items, list and promote them on my shop, test new products and do write ups, network online and read interesting articles...
Oh yeah, and I'm maintaining a 4.0 GPA at the same time. You know it baby! High five to all the wicked smaht kids out there!
You're probably saying 'Holy crap, I'm tired just thinking of all that, let alone doing it, she couldn't posibly really do all that and have a life, and spend time with family and friends!' For the most part if I tried to tackle all that stuff head on everyday I'd be so lost in a sea of infinity there is no way I wouldn't have drowned by now!
In order to fit it all in and not go stark raving mad I developed my personal list of:
Five Rules for Effective Time Management.
1. Take weekends off.
It may sound impossible but for the past month or so I have insisted to myself that I take my weekends back for me and Matt. If I were at a traditional college or a "regular" job it would be rare I'd have a class or work need on the weekends, so why am I going to run my business or school schedule any differently? I'm not! Matt works very hard to make sure we can live on his salary. I also work very hard to create/study. We both work Monday through Friday. Does this mean that emergency situations will never arise, huge papers with tons of research won't be due or an unforseen circumstance won't persent itself where I simply have to do something on the weekend? No, of course not. Even he sometime has to put in an hour or 2 here or there but in general I turn off the computer and close my day planner to any plans that don't involve family, friends, or sporting events on Saturday and Sunday. This is my recharge time and it lets me jump back in on Monday morning fully rejuvinated!
2. Get a day planner and use it!
Speaking of that nice little accessory that sits in front of me at all times...I'm in love with and obsess over my day planner. Now, I'm old school, I need to hand write it all out so its planted solidly in my brain what I'm doing and when. But no matter what kind of device works for you this should be attached to your person during business hours. It is where I create to do lists and check off accomplished tasks daily. However, don't let it get out of control...which leads me to...
3. Don't list more than 6 to-do items in any one day.
Yup, I mean it. For business needs especially I've found that even though every day in my planner has about 15+ lines to fill, if I go above and beyond 6 things then something is going to get missed or completely abandoned. That could be a vital business need like printing flyers for an upcoming networking mixer, or life stuff like doing laundry. If I ever feel like I need to pile it all on & more than 6 things are running through my brain, I divy the items up across the week then take a sheet of paper from the back of the planner, write a 'to do during the week of' list and place it inside my planner on the following week. That way, anything that I didn't get to accomplish clearly wasn't vital and can be finished the next week.
4. Finish the important stuff first, then feel free to play.
School. That's my personal 'business before pleasure' necessity. To me it is a hugely important to a) graduate b) do it with honors and c) understand the information I ingest every week. I literally plan nothing for business or otherwise before 5:00 PM on Monday or Thursday. Those are the days assignments are due at school and I dedicate the entire day to my studies on both. If I finish early and have extra time, great. Sometime I spend that time doing business stuff, other times I don't, just depends how I feel on any given M/H. But I never get myself into business stuff before finishing my school work or I find myself scrambling to get it done late, stressed out and then quality of my work and quality time outside of my studies will suffer. You pickin' up what I'm puttin' down here? Find your highest priority day by day and, no matter how tedious or unfortunate it seems to have to complete it, do it first. Get it out of the way and you'll be happier that you did!
5. During creation time, create. During marketing time, market. Do not get the two confused.
Another way to put this? Get the heck off the computer! I pour my coffee in the morning and get online. It takes me about an hour and 15 minutes to finish my coffee and granola bar. This gives me time to check my emails, pop into facebook / twitter / Etsy / forums / etc. and see what's up in the online world while I wake my ass up! BUT, if its a creation day, I will not be on the computer after that. Period. Tuesdays are generally my admin day -- I write up blog posts for the week, do a little networking with my Etsy Teams, etc. and sometimes there's plenty of time to create items too. That's always fun because I get a two-fer. But generally Wednesday and Friday are my create/photograph days and I like to keep it that way. Yes it means stuff hangs around a little longer but it also means I have the all important, sometimes elusive but never disliked...
Work / Life Balance
I hope these tips can help you to achieve the same and you can use them as inspiration to establish your own Time Management Rules to keep your life and business firmly on track.
How do you maintain a work / life balance? Have any other tips for Effective Time Management that work for you?
September 30, 2011
Friday Feature Finish - Something Soft Like Grasscloth

This finish can be done in panels, stripes, an entire wall in one, or any other number of endless possibilities. I installed this in my mom's house (as shown at the top of the post there) as one of the first finishes I completed when I set out to build my own Faux Finishing company.
The finish is so subtle, from a distance you almost can't even tell its there. But that was exactly what she was looking for. Her bathroom has deep brown tile flooring and light grey accents on the sink top, toilet seat cover and in the ceramic tile tub surround so we worked together to come up with a color that would look nice and work within the muted color palate.
With a white tub, toilet and vanity, plus storage cabinets, we settled on this lovely muted sage green over white. Isn't it so pretty?!

And the possibilities for grasscloth colors are only as endless as your imagination! This photo shows a tone on tone in a khaki shade. Blue on blue in a beach cottage, hot pink on light pink would look really cool in a little girl's room under a chair rail, tan over buttery yellow would look killer on kitchen cabinet door panels...
Where could you picture a grasscloth effect in your home? What colors would you like to see this finish done in?
Subscribe to:
Posts (Atom)